Homemade Stay ปี 2017

Table of Contents
อธิบายตัวแอปพลิเคชัน #
Homemade Stay คือแอปพลิเคชันบน iPad ที่ออกแบบมาช่วยจัดการ ดูแลการเข้าพัก check-in / check-out / ย้ายห้อง หรือค่าใช้จ่ายต่างๆระหว่างเข้าพักในโณงแรม เหมาะกับเข้าของ หรือพนักงาน frontdesk ของโรงแรมขนาดเล็กถึงกลาง
โจทย์สำคัญ #
- ตัวแอปต้องเข้าใจง่าย และสามารถทำงานทุกอย่างได้จากบน iPad โดยที่ยังดูสบายตา เพราะลูกค้าต้องการให้ออกมาดูง่ายๆ ไม่หนักเกินไป
- ต้องมีปฏิทินที่แสดงจำนวนการเข้าพัก วันที่ และห้องที่ถูกจองในหน้าเดียว เพื่อให้เห็นภาพรวมได้อย่างรวดเร็ว
- แสดงรายละเอียดของการเข้าพักได้ครบถ้วนและชัดเจนจากบน iPad
การพัฒนา feature เพื่อตอบโจทย์สำคัญ #
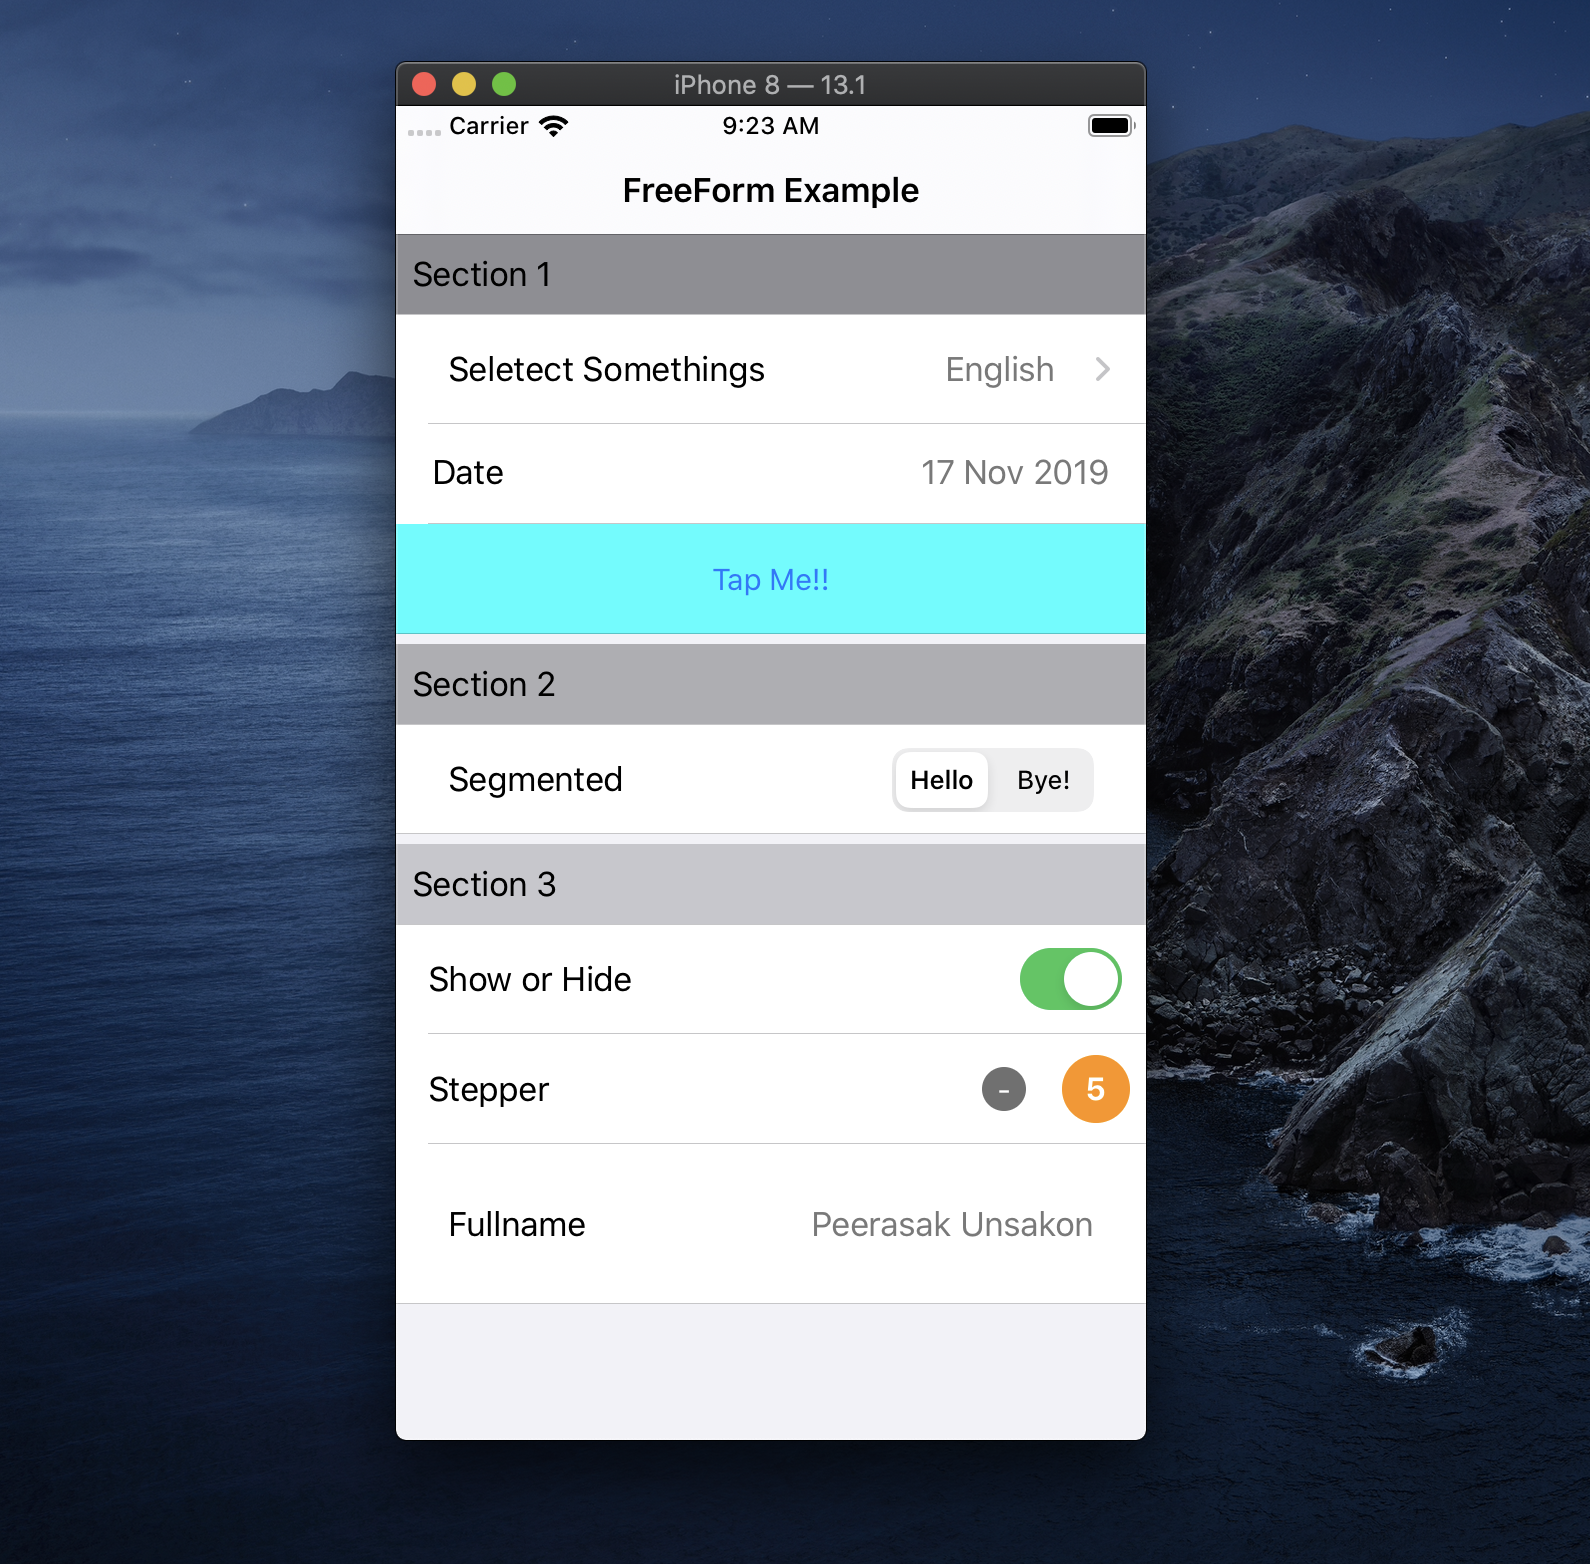
- หน้าหลักแสดง Activities สำคัญที่จะเกิด หลังจากเปิดแอปทำการ login เข้ามาแล้ว จะมีการโหลดข้อมูลการเข้าพักมาจาก API แล้วสร้างเป็น object เก็บไว้ เพื่อความสะดวกในการมองภาพรวม จึงใช้ปุ่ม Arrivals / Departure / In house เพื่อใช้ filter ข้อมูลการพักว่าใครจะทำอะไรบ้างในวันนี้ โดยด้านล่างจะใช้
UICollectionViewปกติในการแสดงผล
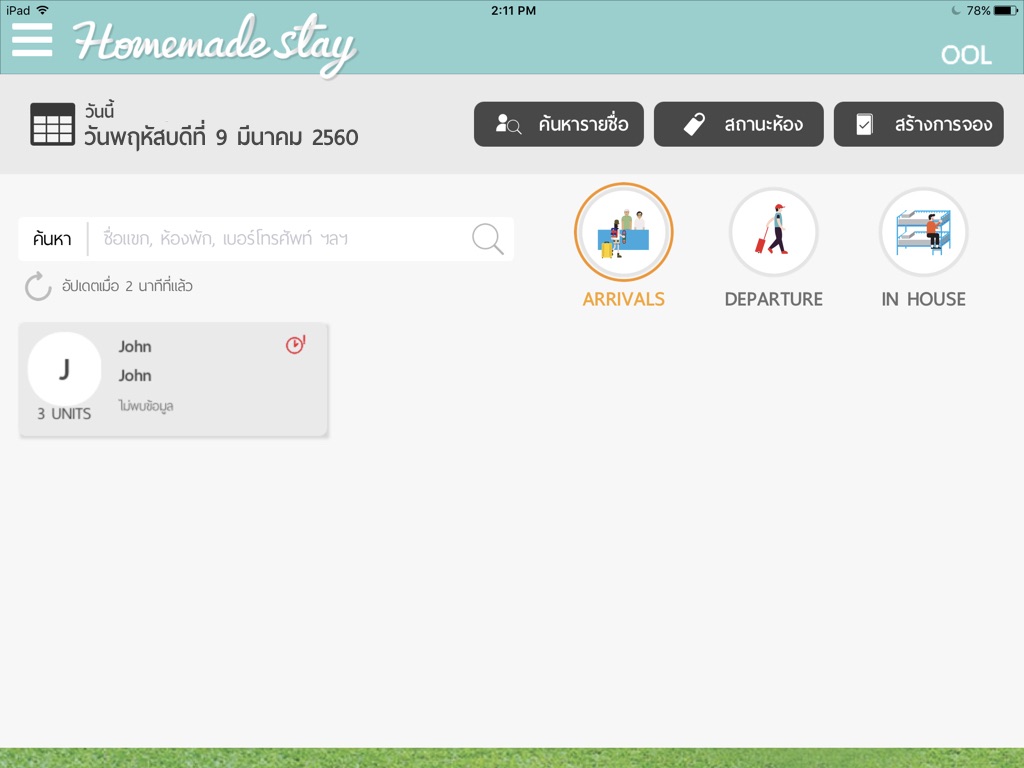
- หน้าปฏิทินการจอง เนื่องจากผู้ใช้ต้องการมองภาพรวม แน่นอนว่าลักษณะนี้คงไม่พ้นการใช้
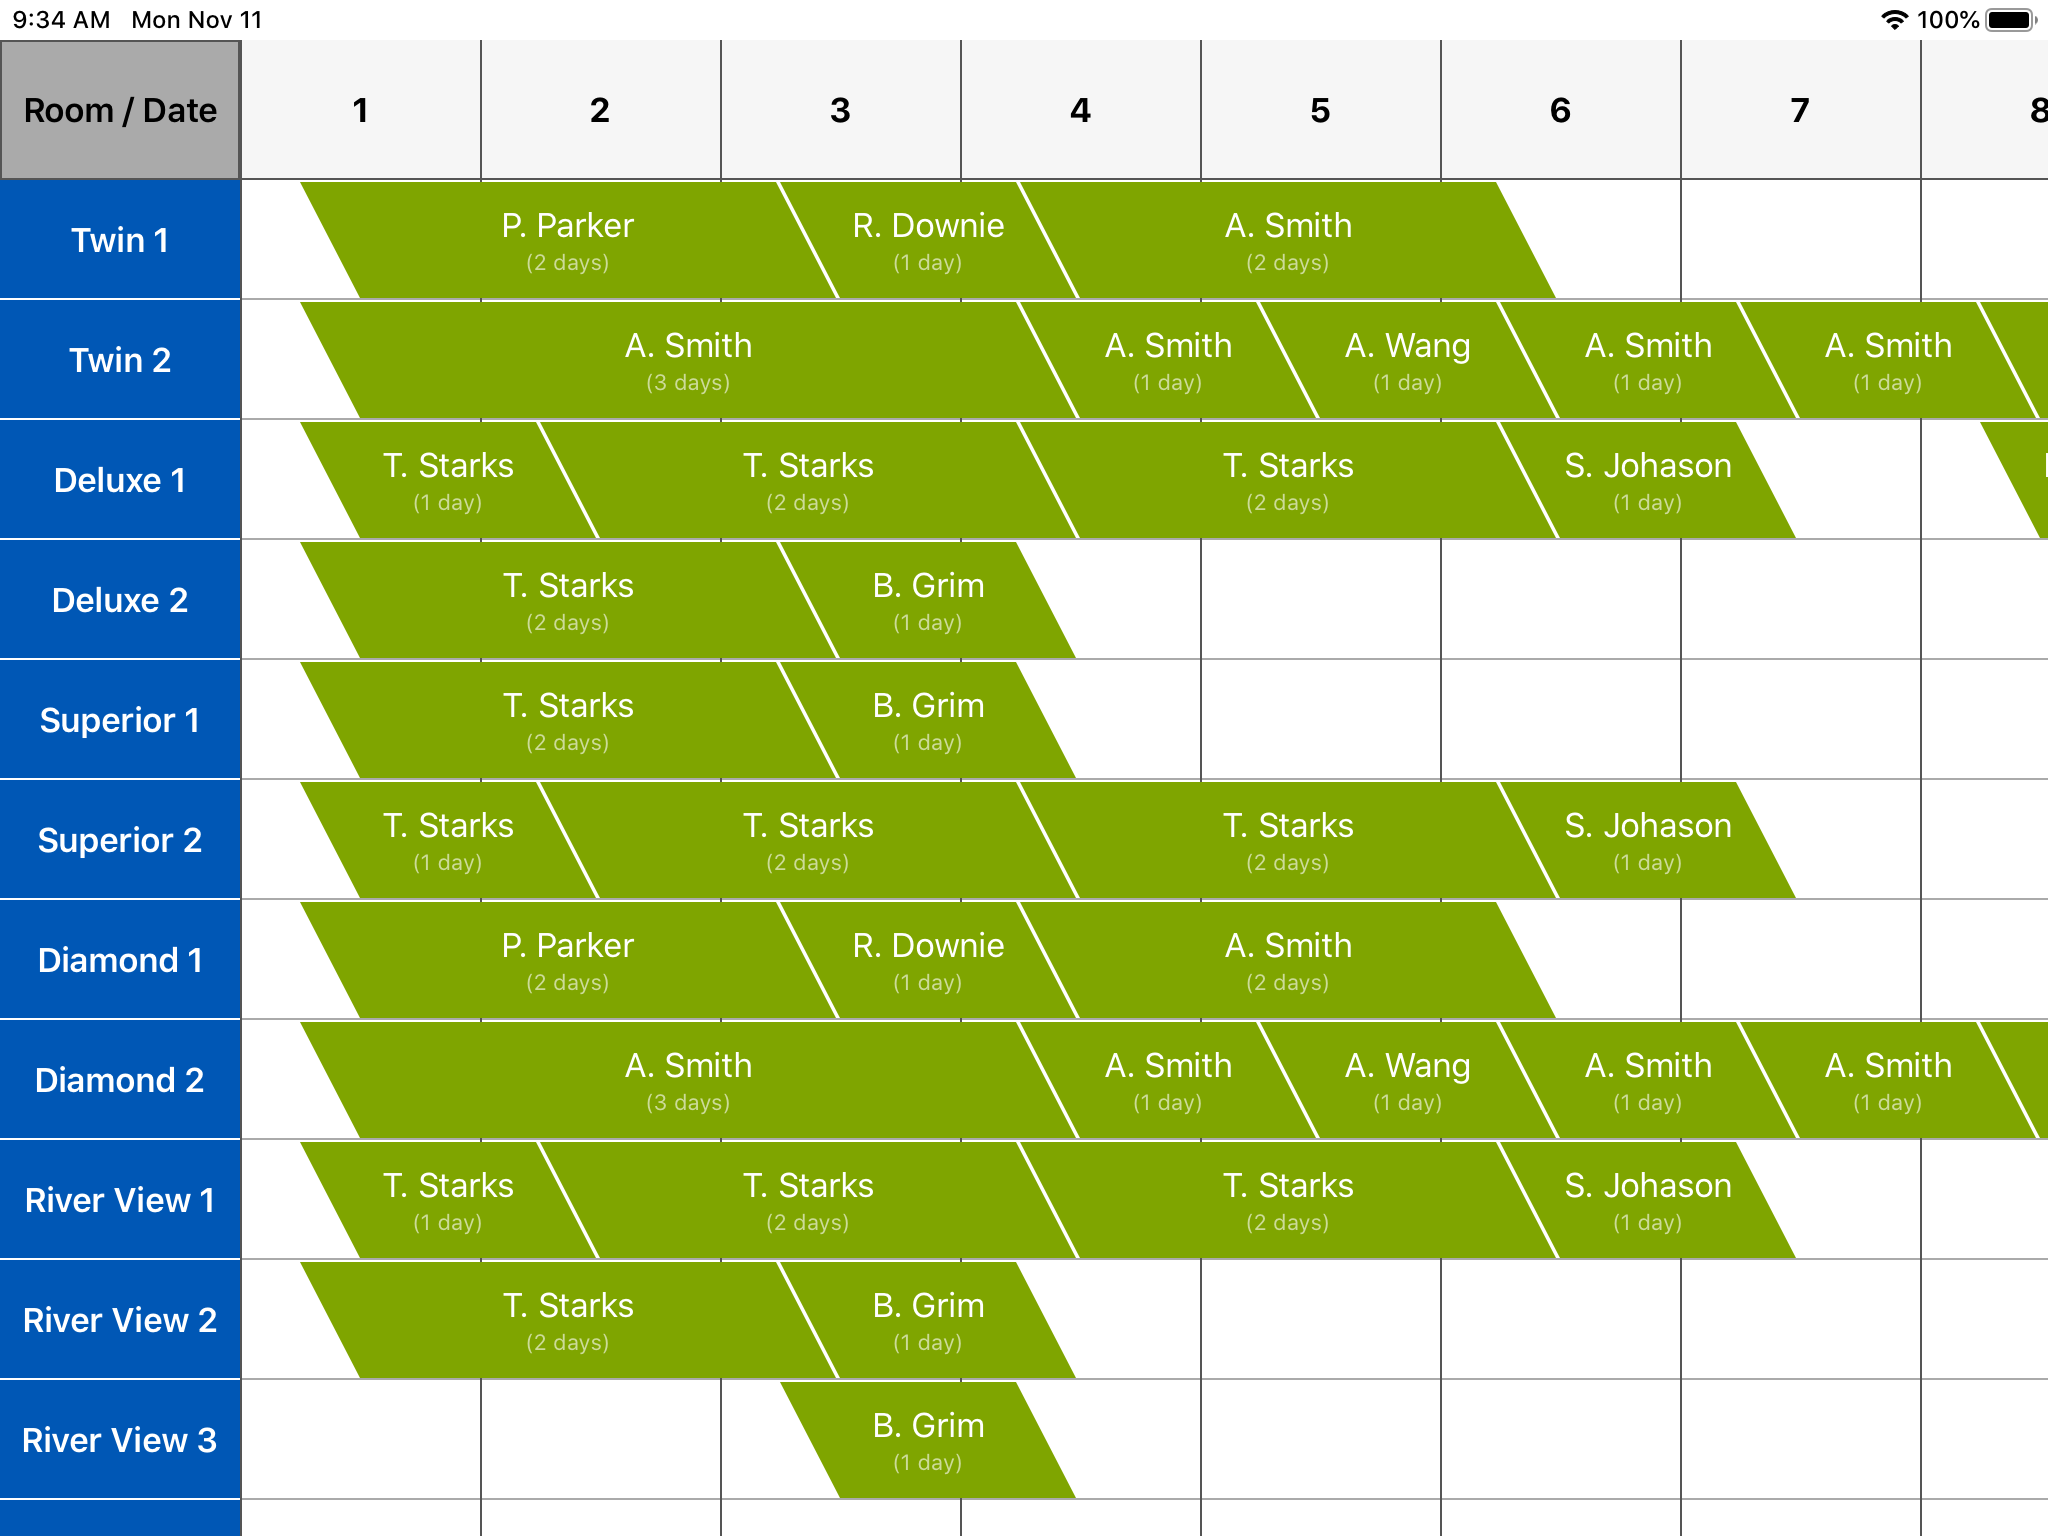
UICollectionViewแน่นอน เพียงแต่ว่า collection view ตัวนี้จะต้องมีทั้ง Row Header และ Column Header เพื่อแสดงวันที่และชนิดของห้องพัก และที่สำคัญคือ cell ของการเข้าพักที่จะต้องปรากฎในลักษณะการวางที่เหลื่อมวัน (เป็นไปตามเวลาการเข้าพักโรงแรมที่ต้องเข้าบ่ายวันนึงและออกเช้าอีกวัน) ทางผู้เขียนเริ่มจากพยายามสร้างCollectionViewขึ้นมาแล้วใช้หลากหลายวิธีเพื่อที่จะลวงตาให้ดูเหมือน cell มันหน้าตาเป็นอย่างในภาพ รวมถึงลองใช้ library หลายๆตัว ก็พบปัญหาหลายส่วนทั้งการ customize ที่จำกัด และที่สำคัญคือเรื่อง performance เพราะทุกวิธีล้วน initialize cell ขึ้นมาตามจำนวน
cells = rooms x days
แปลว่าถ้าโรงแรมขนาดกลางๆมีห้องพัก 35 ห้อง แล้วแสดงใเดือนที่่มี 31 วัน จะต้องมี CollectionViewCell จำนวน 1,085 cells แม้ว่าจะยังไม่มีการจองเข้ามาเลยสักวันเดียว และแอปกระตุกจนไม่สะดวกต่อการใช้งาน ผู้เขียนจึงศึกษาการ custom UICollectionViewLayout ขึ้นมาใหม่ ทำให้เราสามารถควบคุม Datasource, Dalegate และตำแหน่งการแสดงผลของ Cell บน CollectionView ได้อย่างอิสระ และที่สำคัญคือ หากคำนวณกับโรงแรมขนาดเท่าเดิม หากยังไม่มีการจองจะมีการ render cell และ supplement element ขึ้นมารวมกันไม่ถึง 100 ชิ้น ซึ่งนับว่าประหยัด performance ไปได้ดีมาก และทำให้ใช้งานกับ iPad รุ่นเก่าๆได้อย่างไม่มีปัญหา (มีอธิบายต่อให้หัวข้อถัดไป)
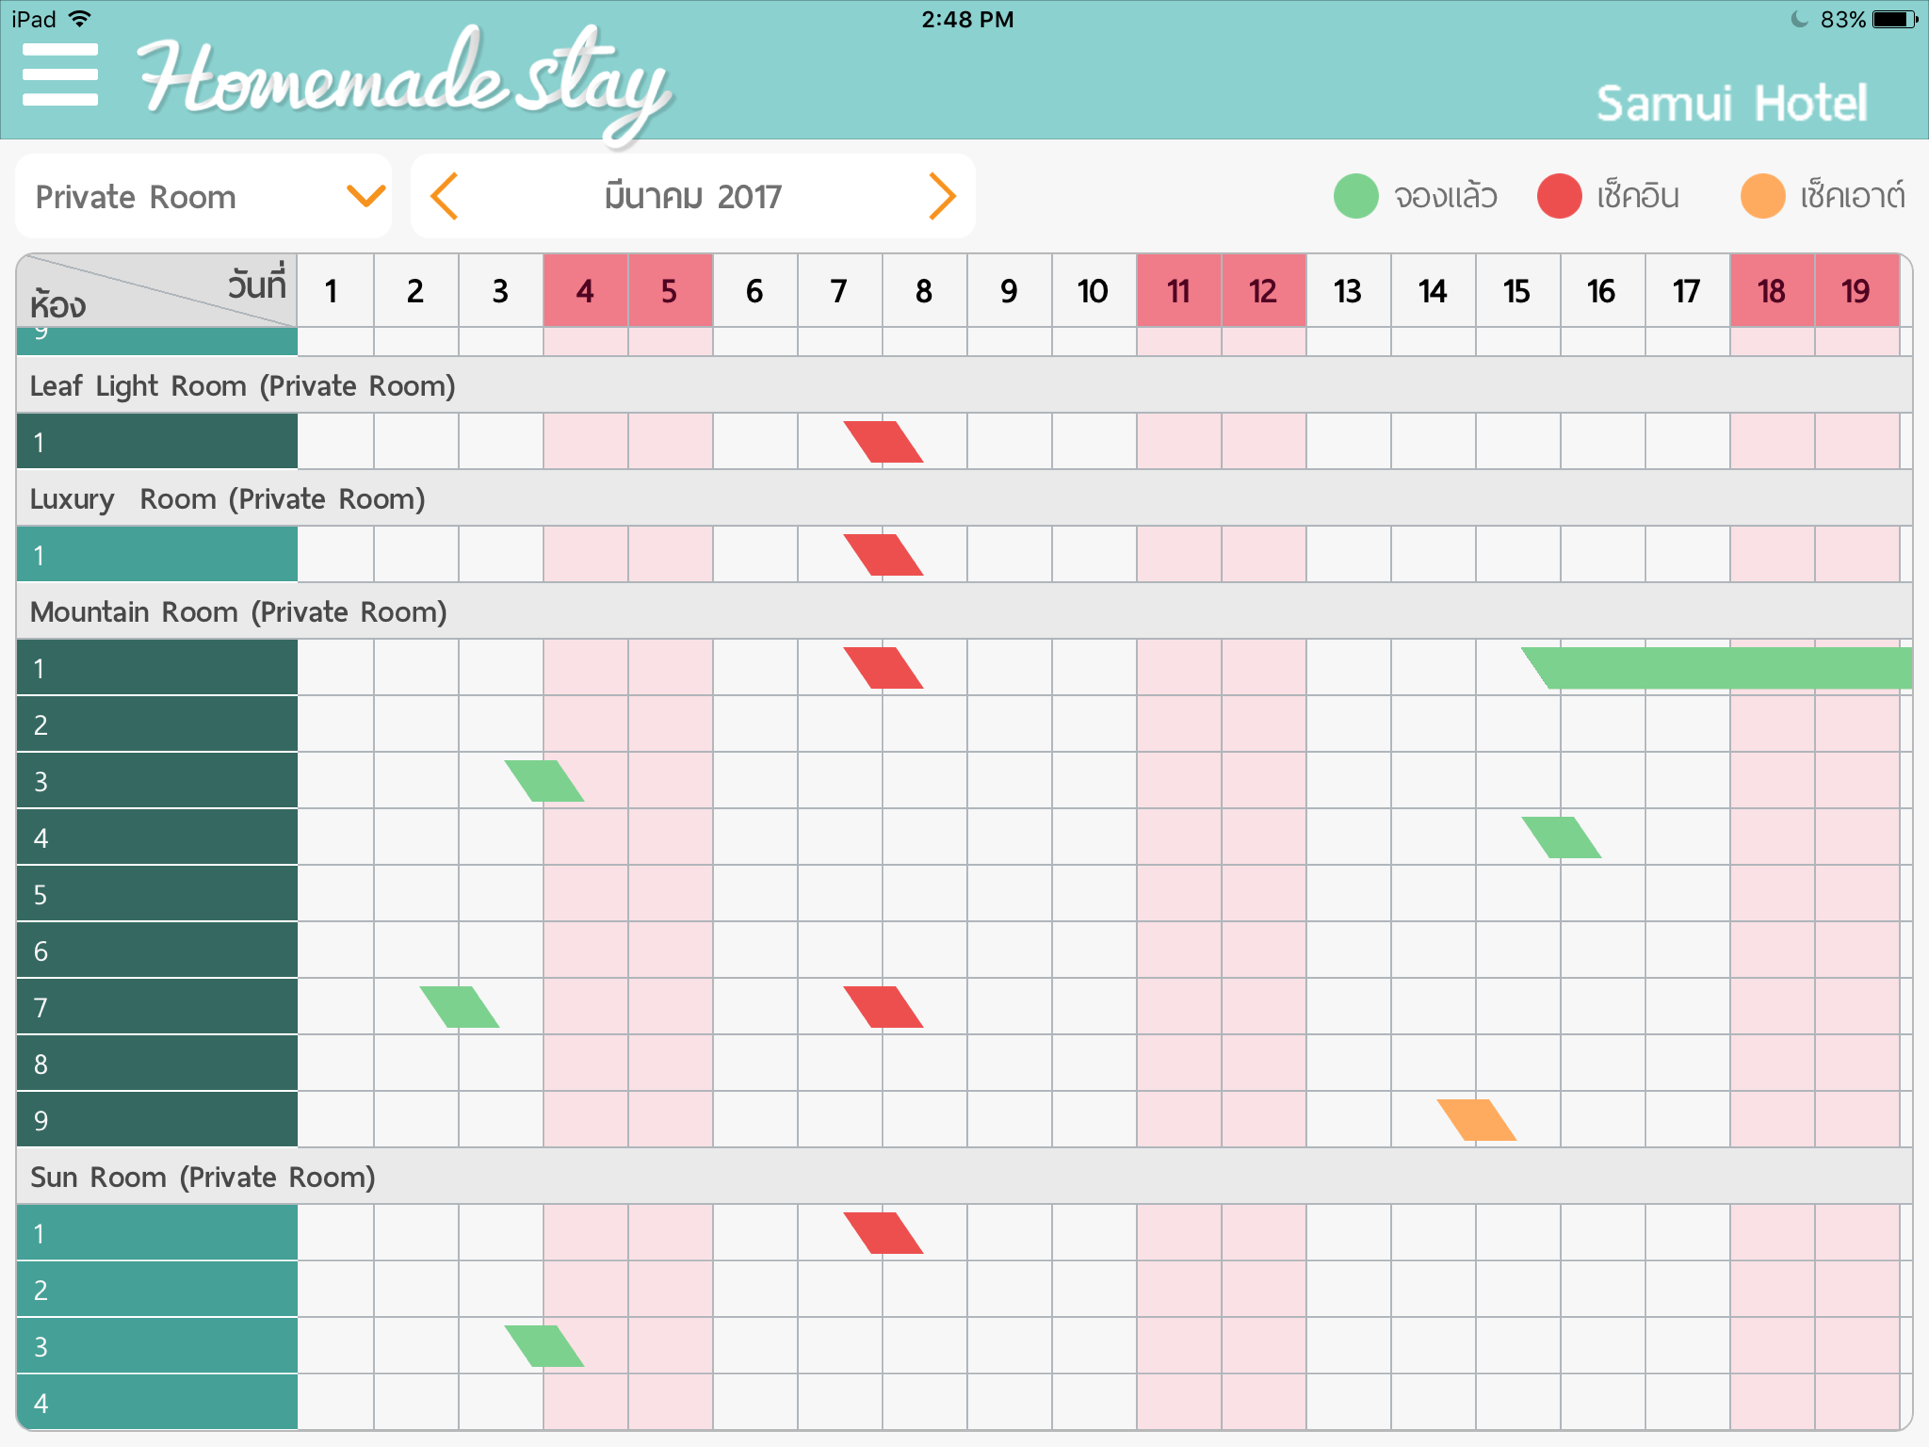
- รายละเอียดการเข้าพัก จะถูกแสดงผลบน
UITableViewแต่ด้วยความหลากหลายของ cell ที่แสดงในหน้านี้ ทำให้ผมหลีกเลี่ยงการเขียนif / switch caseใน datasource หรือ delegate ของUITableViewผมจึงสร้างFreeFormViewControllerขึ้นมาเพื่อเป็นตัวกลางในการขัดการ cell ที่แสดง ทำให้ผมสามารถสร้างหน้า detail หรือ form ผ่าน FreeForm Object โดยที่ไม่ต้องไปเขียนอะไรบนUITableViewอีกเลย และยัง customize ได้เต็มที่ด้วย
ตัวอย่างการเขียน feature บางส่วน #
การทำปฏิทิน โดย custom UICollectionViewLayout #
ก่อนจะเขียน Subclass ของ CollectionViewController ขึ้นมาใหม่ ผมจะเริ่มจากสิ่งเหล่านี้ก่อนนะครับ
สร้าง Cell และ Supplematary element #
- ScheduleCell สำหรับ reservation บนปฏิทิน (Cell)
- ColumnHeader สำหรับวันที่ (Supplematary element)
- RowHeader สำหรับประเภทห้อง (Supplematary element)
- Background สำหรับสร้างเส้นตาราง (Supplematary element)
- Edge มุมบนขวา (Supplematary element)
สร้าง DataSource (คร่าวๆ) #
- อ่าน json text ขึ้นมาแล้วแปลงเป็น data object มาเก็บในรุปแบบ struct แล้วผูกกับ indexPath เก็บไว้ใน datasource
lazy var schedule: [UnitTypeData] = {
      if let path = Bundle.main.path(forResource: "reservations", ofType: "json") {
          do {
              let data = try Data(contentsOf: URL(fileURLWithPath: path))
              guard let unitTypeDatas = try? JSONDecoder().decode([UnitTypeData].self, from: data)
              else {
                  return []
              }
              return unitTypeDatas
            }
          catch {
              return []
          }
      }
      return []
  }()
- จัดการ cell for item at index และ supplematary element of kind at index เพื่อรองรับการ render cell แบบต่างๆ (row header, column header, schedule cell, edge cell)
func collectionView(_ collectionView: UICollectionView, cellForItemAt indexPath: IndexPath) -> UICollectionViewCell {
    let cell = collectionView.dequeueReusableCell(withReuseIdentifier: "ScheduleCell", for: indexPath) as! ScheduleCell
    let group = schedule[indexPath.section]
    let reservation = group.reservations[indexPath.item]
    if let configurationBlock = cellConfigurationBlock {
        configurationBlock(cell, indexPath as NSIndexPath, reservation)
    }
    return cell
}

func collectionView(_ collectionView: UICollectionView, viewForSupplementaryElementOfKind kind: String, at indexPath: IndexPath) ->UICollectionReusableView {
    switch kind {
    case "RowHeader":
        let header = collectionView.dequeueReusableSupplementaryView(ofKind: kind, withReuseIdentifier: "ScheduleRowHeader", for: indexPath) as!ScheduleRowHeader
        if let config = rowHeaderConfigurationBlock {
            config(header, indexPath as NSIndexPath)
        }
        return header
    case "ColumnHeader":
        let header = collectionView.dequeueReusableSupplementaryView(ofKind: kind, withReuseIdentifier: "ScheduleColumnHeader", for: indexPath) as!ScheduleColumnHeader
        if let config = columnHeaderConfigurationBlock {
            config(header, indexPath as NSIndexPath)
        }
        return header
    case "EdgeCell":
        let edgeCell = collectionView.dequeueReusableSupplementaryView(ofKind: kind, withReuseIdentifier: "ScheduleEdgeCell", for: indexPath) as!ScheduleEdgeCell
        return edgeCell
    default:
        let background = collectionView.dequeueReusableSupplementaryView(ofKind: kind, withReuseIdentifier: "ScheduleBackground", for: indexPath)as! ScheduleBackground
        if let config = backgroundConfigurationBlock {
            config(background, indexPath as NSIndexPath, kind)
        }
        return background
    }
}
- จัดการการแสดงลงบน label เช่น
func titleForColumnHeaderViewAtIndexPath(indexPath: NSIndexPath) -> String {
    return "\(indexPath.item + 1)"
}

func titleForRowHeaderViewAtIndexPath(indexPath: NSIndexPath) -> String {
    return "\(rowHeaderTitles[indexPath.item])"
}
สร้าง Delegate #
- เพิ่ม closure block สำหรับ cell เวลาโดน tap (จะได้ไม่ต้องไปดักที่ didSelectItemAt)
typealias CellDidSelectItemBlock = (_ indexPath: NSIndexPath, _ reservation: Reservation) -> ()

class PKTimelineDelegate: NSObject, UICollectionViewDelegate {
    var cellDidSelectItemBlock: CellDidSelectItemBlock?

    func collectionView(_ collectionView: UICollectionView, didSelectItemAt indexPath: IndexPath) {
        if let didSelectItemBlock = cellDidSelectItemBlock {
            let datasource = collectionView.dataSource as! PKTimelineDataSource
            let group = datasource.schedule[indexPath.section]
            didSelectItemBlock(indexPath as NSIndexPath, group.reservations[indexPath.row])
        }
    }
}
สร้าง ViewController #
- Register cell กับ nib file
let rowHeaderNib = UINib(nibName: SCHEDULE_ROW_HEADER, bundle: nil)
let columnCeaderNib = UINib(nibName: SCHEDULE_COLUMN_HEADER, bundle: nil)
let backgroundNib = UINib(nibName: SCHEDULE_BACKGROUND, bundle: nil)
let edgeCellNib = UINib(nibName: SCHEDULE_EDGE, bundle: nil)

collectionView!.register(rowHeaderNib, forSupplementaryViewOfKind: ROW_HEADER, withReuseIdentifier: SCHEDULE_ROW_HEADER)
collectionView!.register(columnCeaderNib, forSupplementaryViewOfKind: COLUMN_HEADER, withReuseIdentifier: SCHEDULE_COLUMN_HEADER)
collectionView!.register(backgroundNib, forSupplementaryViewOfKind: COLUMN_BACKGROUND, withReuseIdentifier: SCHEDULE_BACKGROUND)
collectionView!.register(backgroundNib, forSupplementaryViewOfKind: ROW_BACKGROUND, withReuseIdentifier: SCHEDULE_BACKGROUND)
collectionView!.register(edgeCellNib, forSupplementaryViewOfKind: EDGE_HEADER, withReuseIdentifier: SCHEDULE_EDGE)
- สร้าง DataSource สำหรับ collectionview ของเรา
let dataSource = collectionView!.dataSource as! PKTimelineDataSource
dataSource.setDefaults()

let schedule = dataSource.schedule

var numberOfRow: Int = 0

for group in schedule {
    numberOfRow = numberOfRow + group.units.count
}

dataSource.numberOfRowsInSchedule = numberOfRow
dataSource.numberOfColumnsInSchedule = 31
- config datasource และ delegate ผ่าน closure block ที่สร้างไว้
dataSource.cellConfigurationBlock = {(cell: ScheduleCell, indexPath: NSIndexPath, reservation: Reservation) in
    let days = reservation.endAt - reservation.startAt
    cell.layer.shouldRasterize = true
    cell.layer.rasterizationScale = UIScreen.main.scale
    cell.nameLabel.text = reservation.guestName
    cell.timeLabel.text = "(\(days) \(days > 1 ? "days" : "day"))"
    cell.layer.shouldRasterize = true
    cell.layer.rasterizationScale = UIScreen.main.scale
}

dataSource.rowHeaderConfigurationBlock = {(header: ScheduleRowHeader, indexPath: NSIndexPath) in
    header.layer.shouldRasterize = true
    header.layer.rasterizationScale = UIScreen.main.scale
    header.rowTitleLabel.text = dataSource.titleForRowHeaderViewAtIndexPath(indexPath: indexPath)
}

dataSource.columnHeaderConfigurationBlock = {(header: ScheduleColumnHeader, indexPath: NSIndexPath) in
    header.layer.shouldRasterize = true
    header.layer.rasterizationScale = UIScreen.main.scale
    header.titleLabel.text = dataSource.titleForColumnHeaderViewAtIndexPath(indexPath: indexPath)
    header.leftVerticalLineView.isHidden = false
    header.rightVerticalLineView.isHidden = true
    header.bottomLineView.isHidden = false
}

dataSource.backgroundConfigurationBlock = {(background: ScheduleBackground, indexPath: NSIndexPath, kind: String) in
    if kind == COLUMN_BACKGROUND {
        background.verticalLineView.isHidden = false
        background.horizontalLineView.isHidden = true
    }else {
        background.verticalLineView.isHidden = true
        background.horizontalLineView.isHidden = false
    }
}

let delegate = collectionView!.delegate as! PKTimelineDelegate
delegate.cellDidSelectItemBlock = {(indexPath: NSIndexPath, reservation: Reservation) in

    let alertController = UIAlertController(title: "Hola!", message: "select: \(reservation.guestName)", preferredStyle: .alert)
    let OKAction = UIAlertAction(title: "OK", style: .default) { (action) in
        print("Show details")
    }
    alertController.addAction(OKAction)
        self.present(alertController, animated: true) {
    }
}
สร้าง UICollectionViewLayout #
- เนื่องจากสิ่งที่เราอยากไม่ได้ ไม่ใช่ collection view ปกติที่เป็นตารางของ cell เรียงๆกันใน layer เดียว เรามีหลาย layer เลยต้องจัดการเองหมด เช่น
PKTimelineLayout.swift
...
if reservationFrames.isEmpty {
   for section in 0..<collectionView!.numberOfSections {
       for item in 0..<collectionView!.numberOfItems(inSection: section) {
           let indexPath = NSIndexPath(item: item, section: section)
           let rect = frameForReservation(
               reservation: dataSource.reservationForIndexPath(indexPath: indexPath),
               atIndexPath: indexPath)
           let frame = Frame(rect: rect, indexPath: indexPath)
           reservationFrames.append(frame)
        }
    }
}
...
- layoutAttributesForElements อันนี้คือตอนที่เริ่มมีการ scroll เกิดขึ้น เช่น
PKTimelineLayout.swift
 override func layoutAttributesForElements(in rect: CGRect) -> [UICollectionViewLayoutAttributes]? {
    var layoutAttributes: [UICollectionViewLayoutAttributes] = []

    for frame in reservationFrames {
        if frame.rect.intersects(rect) {
            let attributes = UICollectionViewLayoutAttributes(forCellWith: frame.indexPath as IndexPath)
            attributes.frame = frame.rect
            layoutAttributes.append(attributes)
        }
    }
    ...
 }
กำหนดทุก cell จนครบเราจะได้หน้าตาปฏิทินดังนี้
ตัวอย่าง PKTimelineViewController #
https://gitlab.com/clonezer/pktimelineviewcontroller
FreeForm สำหรับความสะดวกในการสร้าง UITableView #
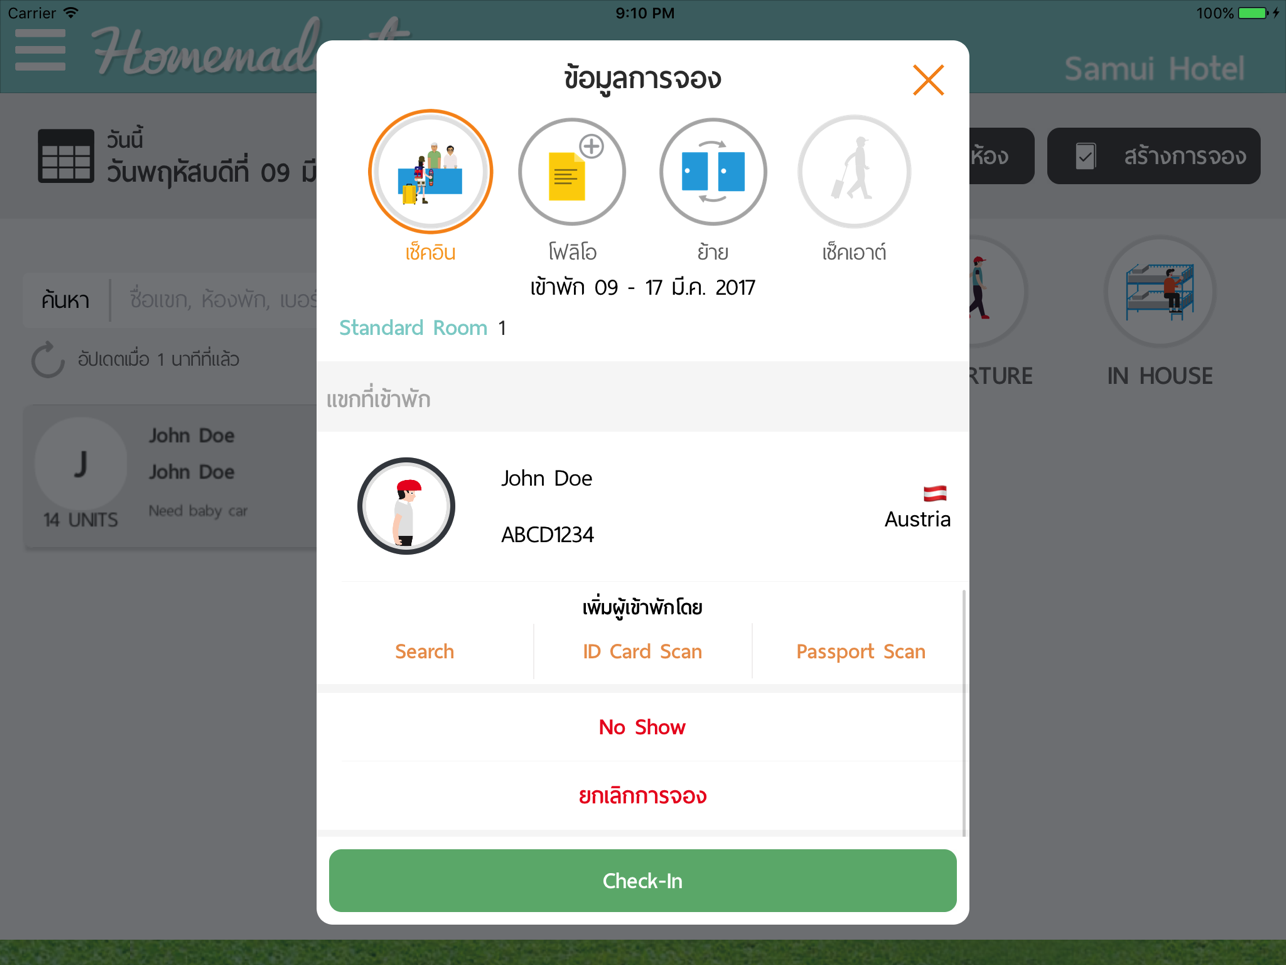
- FreeForm คือ Class ที่เขียนขึ้นมาครอบการทำงานของ UITableViewController อีกชั้นหนึ่ง สามารถจัดการ cell / section ผ่าน object ได้เลย โดยไม่ต้องไปยุ่งกับ
TableViewDataSourceสะดวกกับการพัฒนาเพราะไม่ต้องเปิด Storyboard ขนาดใหญ่ ซึ่งอาจจะทำงานได้ไม่ดีนักกับเครื่องที่มี RAM ไม่มาก
เริ่มต้นการใช้งาน #
เริ่มจากการสร้าง section และ row object ขึ้นมา ก่อนโดยเราสามารถระบุไว้ได้เลยว่าต้องการให้เป็น row ประเภทไหนและมีค่าอะไร
var section1 = FreeFormSection(tag: "Demo1", title: "Section 1")
var section2 = FreeFormSection(tag: "Demo2", title: "Section 2")
var section3 = FreeFormSection(tag: "Demo3", title: "Section 3")

let pushOptions = FreeFormPushRow(tag: "Push", title: "Seletect Somethings", value: "Thai", options: ["Thai", "English"])
let text = FreeFormTextRow(tag: "Text", title: "Fullname", value: "Peerasak Unsakon" as AnyObject)
let datetime = FreeFormDatetimeRow(tag: "Datetime", title: "Date", selectedDate: Date(),
                                   min: Calendar.current.date(byAdding: .day, value: -10, to: Date()),
                                   max: Calendar.current.date(byAdding: .day, value: 10, to: Date()))
let segmented = FreeFormSegmentedRow(tag: "Segmented", title: "Segmented", value: "Hello", options: ["Hello", "Bye!"])
let button = FreeFormButtonRow(tag: "Button", title: "Tap Me!!")
let stepper = FreeFormStepperRow(tag: "Stepper", title: "Stepper", max: 10, min: 0, value: 0)
let switchRow = FreeFormSwitchRow(tag: "Switch", title: "Show or Hide", value: true as AnyObject?)
นำเอา Section และ Row ที่สร้างไว่้ไปใส่ใน Form โดยเราสามารถเรียงลำดับได้เองตาม array #
self.form.title = "FreeForm Example"

self.section1 = {
    let section = self.section1
    section.addRow(self.pushOptions)
    section.addRow(self.datetime)
    section.addRow(self.button)

    section.customHeader = { titleView in
        titleView.backgroundColor = .systemGray
    }

    section.headerHeight =  40

    return section
}()

self.section2 = {
    let section = self.section2
    section.addRow(segmented)
    section.customHeader = { titleView in
        titleView.backgroundColor = .systemGray2
    }

    section.headerHeight =  40
    return section
}()

self.section3 = {
    let section = self.section3
    section.addRow(self.switchRow)
    section.addRow(self.stepper)
    section.addRow(self.text)

    section.customHeader = { titleView in
        titleView.backgroundColor = .systemGray3
    }

    section.headerHeight =  40
    return section
}()

self.form.addSection(self.section1)
self.form.addSection(self.section2)
self.form.addSection(self.section3)
Custom Row แต่ละตัว #
ใน row object จะมี closure ชื่อ customCell รอรับการ custom ตัว TableViewCell อยู่แล้ว เราสามารถเขียนได้เลยโดยไม่ต้องเข้าไปเขียนใน DataSource
self.segmented.customCell = { cell in
    guard let segmentedCell = cell as? FreeFormSegmentedCell else { return }
    segmentedCell.segmentedControl.tintColor = UIColor.red
}

self.segmented.didChanged = { value, row in
    guard let text = value as? String else { return }
    if text == "Bye!" {
        self.stepper.hidden = true
        self.text.height = 150
    }else {
        self.stepper.hidden = false
        self.text.height = 80
    }
    self.form.reloadForm(true)
}

self.button.customCell = { cell in
    guard let buttonCell = cell as? FreeFormButtonCell else { return }
    buttonCell.backgroundColor = UIColor.cyan
}

self.button.didTapped = { row in
    guard let buttonCell = row.cell as? FreeFormButtonCell else { return }
    if buttonCell.button.titleLabel?.text == "Tap Me!!" {
        buttonCell.button.setTitle("I'm a Button", for: .normal)
    }else {
        buttonCell.button.setTitle("Tap Me!!", for: .normal)
    }
}

self.switchRow.didChanged = { value, row in
    guard let isOn = value as? Bool else {
        return
    }
    //สามารถเปลี่ยนแปลงค่าใน row อื่นได้จากใน didChanged ด้วย
    self.button.hidden = !isOn
    self.form.reloadForm(true)
}
เมื่อทุกอย่างเรียบร้อยแล้วเมื่อ run เราก็จะได้ TableView ที่มี Cell ตามที่เราต้องการ นอกเหนือจากนี้ยังสามารถ custom FreeForm Row ได้ตามต้องการดังภาพตัวอย่างในแอปนั่นเอง
